
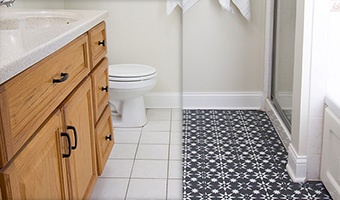
Floor paint is an easy and affordable alternative to replacing outdated floors. Rust-Oleum HOME Interior Floor Coating lets you paint over your existing flooring without stripping, sanding or priming. It’s a durable floor paint for bare, stained, sealed or previously coated wood, tile, vinyl, laminate, concrete or linoleum.
 STEP 1
First, clean the floor. We recommend using Krud Krutter Cleaner/Degreaser to remove any dirt and debris from the floor. Make sure the floor is dry before painting. |
 STEP 2
Remove any caulk. Then, apply painter's tape where the wall meets the floor and along the edges of anywhere else you don't want to paint (such as a bathtub). |

 STEP 3
Using the base coat, cut in around the edges using a quality synthetic brush. This will allow for a uniform finish and lets you get to areas where a paint roller can’t. |
 STEP 4
Next, use a paint roller to apply the rest of the base coat. Start in the back of the room and work in 4x4-foot sections, leaving a wet edge to ensure a uniform finish. A 3/8-inch nap paint roller will give you the smoothest finish. |
 STEP 5
Most colors should only require one coat of floor paint. If a second coat is needed to get your desired look, make sure to wait 6 hours for the first coat to dry. If you apply a second coat or decide to paint a design using a stencil, you only need to wait 1-2 hours for the second coat to dry before using a top coat. |
 STEP 6
Make sure to wear socks or booties between coats to prevent leaving footprints or dust on the paint. |
 STEP 7
Once your floor paint is dry, use a tack cloth to pick up any dust or debris on the floor before applying your top coat. This will keep any particles from getting into the paint and give your floor a smooth finish. |
 STEP 8
Next, using the top coat, cut in around the edges using a quality synthetic brush, the same way you did the base coat. |
 STEP 9
Then, roll the rest of the top coat, starting in the back of the room working in 4x4-foot sections again, making sure to leave a wet edge. For the top coat, use a 1/4-inch nap roller for best results. |
 STEP 10
Only one coat of top coat is required. If a second coat is desired for additional durability or uniformity, wait until the first coat is dry to the touch (about 1-2 hours) before applying with a new paint roller. Apply the second coat within 24 hours. |
 STEP 11
Once you have applied the top coat, allow it to dry for 24 hours before any light foot traffic. Be sure to allow 72 hours before replacing any furniture (and avoid dragging it on the floor). The floor will be ready for full use in 7 days. After the top coat has dried for 7 days, you can wash your floor. Most general purpose, non-abrasive cleaners will help keep your floor clean and looking new. |
 STEP 12
If you removed caulk before painting, replace it with DAP caulk to complete your project. |